
Documentation Index

Fetch the complete documentation index at: https://terminal49.com/docs/llms.txt

Use this file to discover all available pages before exploring further.

Prerequisites

  • A Terminal49 account.
  • A Publishable API key, which you can get by reaching out to support@terminal49.com.
  • Familiarity with the Shipments API and Containers API. The following examples pass
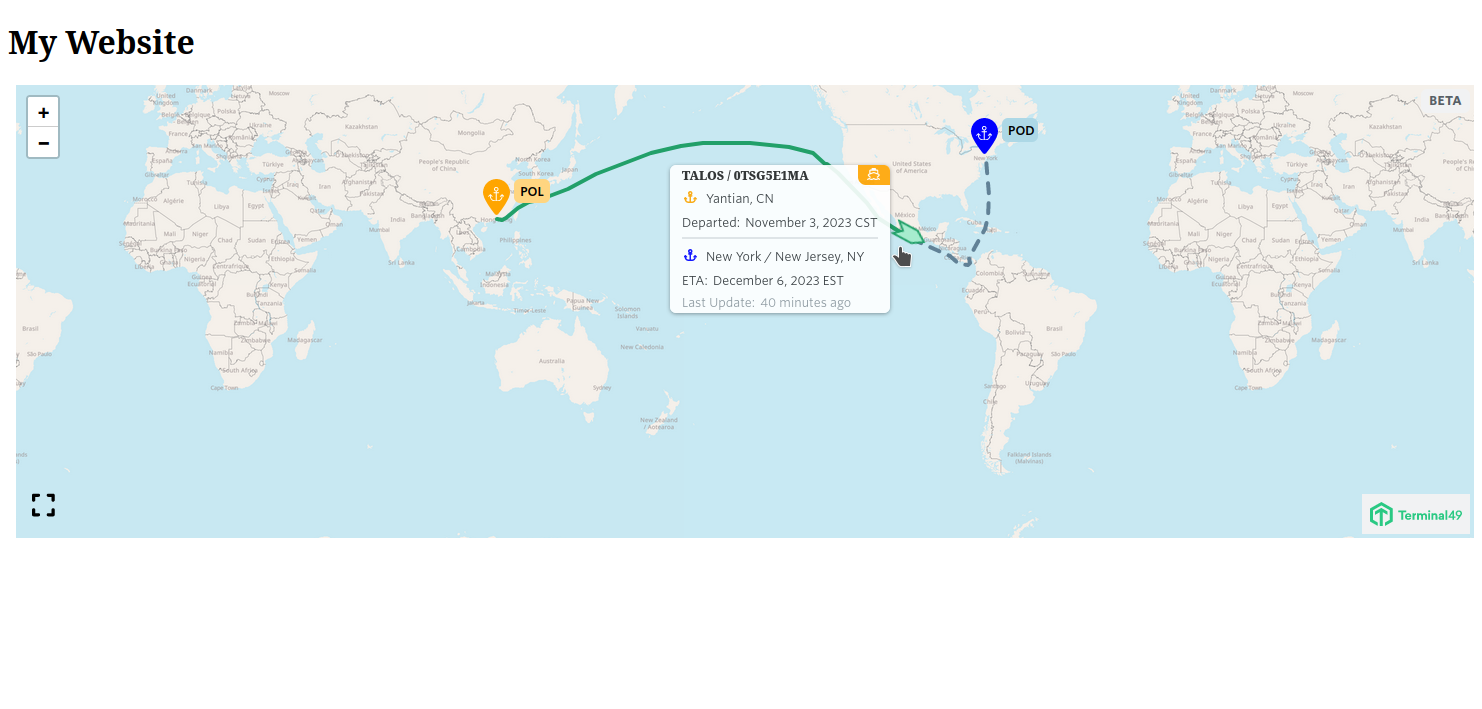
 containerId and shipmentId variables to the embedded map. They relate to id attributes of the container and shipment objects that are returned by the API.

How do I embed the map on my website?

Once you have the API Key, you can embed the map on your website.
  1. Copy and paste the code below and insert it on your website. Once loaded, this will make the map code available through the global window object.
Just before the closing </head> tag, add the following link tag to load the map styles.
<head>
  <meta charset="UTF-8">
  <meta name="viewport" content="width=device-width, initial-scale=1.0">
  <title>Document</title>
  <link rel="stylesheet" href="https://map.terminal49.com/bundle.css" />
</head>
Just before the closing </body> tag, add the following script tag to load the map code.
<body>
  <!-- Other tags -->
  <script src="https://map.terminal49.com/bundle.js"></script>
</body>
  1. Define a container where you want the map to be displayed.
<div id="map"></div>
  1. After the code is loaded, you can use the window.TntMap class to create a map instance.
const map = new window.TntMap("#map", {
  authToken: publishableApiKey,
});
Notice that the authToken option is required. This is where you pass your Publishable API key.
  1. Start the map. This tells the map to initialize and hook into the element designated during initialization.
await map.start();
  1. Final step: load a container. You can pass shipment and container ids to the map where it’ll fetch the data and display it.
await map.load(shipmentId, containerId);
  1. Putting it all together, here is the javascript code that you need to embed the map on your website.
const map = new window.TntMap("#map", {
  authToken: publishableApiKey,
});

await map.start();
await map.load(shipmentId, containerId);
If you want to use inside the browser you can use the IIFE pattern.
<script>
  (async () => {
    const map = new window.TntMap("#map", {
      authToken: publishableApiKey,
    });

    await map.start();
    await map.load(shipmentId, containerId);
  })();
</script>
Or you can use module attribute to use top-level async/await.
<script type="module">
  const map = new window.TntMap("#map", {
    authToken: publishableApiKey,
  });

  await map.start();
  await map.load(shipmentId, containerId);
</script>
terminal49-map.png Additionally, the map element doesn’t have to be an element id but can be a DOM element reference instead. Consider this example, which uses a query selector to select the map element.
const element = document.querySelector("#map");
const map = new window.TntMap(element, {
  authToken: publishableApiKey,
});

Styling the map

All of the map styles are written as human-readable CSS classes and variables. You can use these to customize the map to your liking. The styles are written in BEM style as well as they’re scoped under a .tntm class to avoid style conflicts with your website.

Sizing

By default the map will take the full width of its container and some height. The map is expandable by clicking on the expand button on the bottom left corner of the map. You can also override the default styles to customize the map to your liking. For example, to tell the map to take 60% of the total viewport size when expanded, do the following:
.tntm .tntm__container.--expanded {
  height: 60vh;
}
terminal49-map-expanded.png

Colors

Terminal49 exposes a number of CSS variables that you can use to customize the map colors. All of the variables are bound to the .tntm class to avoid style conflicts with your website.
.tntm {
  --marker-background-color: var(--athens-gray-500);
  --marker-border-color: var(--athens-gray-500);
  --marker-text-color: var(--white);
  --marker-secondary-background-color: var(--athens-gray-100);
  --marker-secondary-text-color: var(--athens-gray-500);
}
By default, their values are set to the Terminal49 brand colors. Don’t change these — focus on the --marker variants instead. Additionally, the variables might require adjusting for different states of the map markers. For example, to display markers ‘visited’ by a vessel as orange and others (in the ‘on-the-way’ state) as blue: First, define the default, blue color:
.tntm [data-journey-state='on-the-way'] {
  --marker-background-color: blue;
  --marker-border-color: lightblue;
  --marker-text-color: var(--white);
  --marker-secondary-background-color: lightblue;
  --marker-secondary-text-color: black;
}

.tntm [data-journey-state='visited'] {
  --marker-background-color: orange;
  --marker-border-color: #FFD580;
  --marker-text-color: var(--white);
  --marker-secondary-background-color: #FFD580;
  --marker-secondary-text-color: black;
}
Result: terminal49-map-colors.png You can also change the marker colors based on whether they are hovered over or not. This is how the Terminal49 website styles the map markers:
[data-journey-state='visited'] {
  --marker-background-color: var(--green-600);
  --marker-border-color: var(--green-600);
  --marker-text-color: var(--white);
  --marker-secondary-background-color: var(--green-50);
  --marker-secondary-text-color: var(--green-600);
}

[data-journey-state='on-the-way'] {
  --marker-background-color: var(--athens-gray-500);
  --marker-border-color: var(--athens-gray-500);
  --marker-text-color: var(--white);
  --marker-secondary-background-color: var(--athens-gray-100);
  --marker-secondary-text-color: var(--athens-gray-500);
}

[data-hovered][data-journey-state='visited'],
[data-hovered] [data-journey-state='visited'] {
  --marker-secondary-background-color: var(--green-200);
  --marker-secondary-text-color: var(--green-700);
  --marker-border-color: var(--green-700);
}

[data-hovered][data-journey-state='on-the-way'],
[data-hovered] [data-journey-state='on-the-way'] {
  --marker-secondary-background-color: var(--athens-gray-200);
  --marker-secondary-text-color: var(--athens-gray-600);
  --marker-border-color: var(--athens-gray-600);
}
You might want to copy this code and adjust it to your needs.